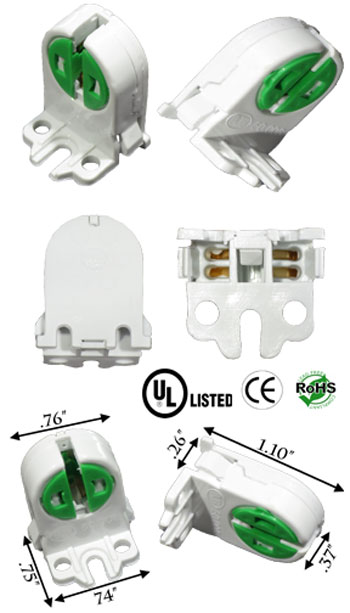
You’re probably here because you’re having issues with your fluorescent lamp, right? Maybe it’s flickering, buzzing, or not lighting up at all. It’s annoying and can even disrupt your day-to-day tasks. The culprit behind this problem could be your lamp holder. Don’t worry, though! I’m here to show you how to replace a fluorescent lamp holder, a simple DIY task that can save you both time and money.
Fortunately, replacing a fluorescent lamp holder doesn’t require any specialized tools or extensive knowledge. In fact, it’s a straightforward task that can be done with basic household items. I’ve been doing this for years, and I’m confident that you can do it, too!
Stay with me as I guide you through this process. You’ll find it less intimidating and more empowering than you might have initially thought.
Why should you replace a fluorescent lamp holder?
According to our experience, one of the most common causes of a malfunctioning fluorescent lamp is a worn-out lamp holder. The holder is where the bulb connects to the electrical supply. Over time, this can become damaged, causing the bulb to flicker or not work at all.

It’s essential to understand that neglecting a faulty lamp holder can lead to more significant problems, including short circuits. Therefore, immediate action is recommended. Thankfully, our company, James Lighting, specializes in manufacturing top-quality lamp holders primarily used on light sources for lighting fixtures.
How can you tell if your lamp holder needs replacing?
Before jumping into the replacement process, you need to ensure that the lamp holder is the real issue. You can start by observing the symptoms. If your bulb is flickering, dim, or entirely non-functional, it may be the lamp holder’s fault.

According to JAMES data, another telltale sign of a faulty lamp holder is if the bulb doesn’t sit correctly within it. This happens when the lamp holder loses its grip due to wear and tear. At JAMES, we ensure our lamp holders are resilient and long-lasting, minimizing such occurrences.
What are the steps to replace a fluorescent lamp holder?
First, ensure you have a new lamp holder at hand. You can trust our JAMES lamp holders for this task, given their reliable performance. Now, let’s jump into the actual steps.
- Turn off the power: Safety first! Make sure to switch off the power supply to avoid any risk of electrocution.
- Remove the bulb: Once the power is off, carefully remove the fluorescent lamp from the holder.

- Remove the faulty lamp holder: Unscrew the lamp holder from the fixture. It’s typically secured with a couple of screws.
- Install the new lamp holder: Align your new JAMES lamp holder with the screw holes and secure it tightly.

- Replace the bulb and restore power: Once the new holder is installed, carefully insert the bulb into it and restore the power supply.
Remember, each of these steps must be taken with care. We don’t want any accidents happening, right?
Is it easy to replace a fluorescent lamp holder?
It might seem daunting initially, but with careful steps and the right materials (like our JAMES lamp holders), it’s a breeze. According to our experience, most people who replaced their lamp holders reported that the task was easier than they expected.

Conclusion
Replacing a fluorescent light connector is a task that’s well within your reach. Don’t let a small problem like a faulty lamp holder disrupt your peace or your day-to-day activities. With the right guide and the right products, like our JAMES lamp holders, you can become your own handyman. Trust me, the sense of accomplishment you’ll get from this DIY task will be well worth it!
